The Stampin’ Up! Holiday catalog is literally full of wonderful stamp sets, designer series papers, new embellishments, and pages of great ideas for the upcoming holidays. You don’t have to turn very far into the catalog to find the wonderful Cookie Cutter Christmas stamp set, corresponding punch, designer series paper, and accessories. If you’re like me, you’ll start thinking about all the cute cards and projects you can make with gingerbread cookies.
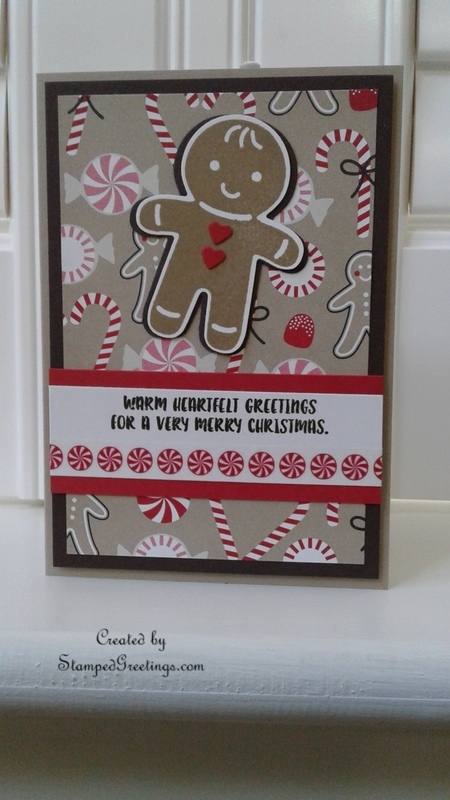
Pictured below is one idea of how to use this line of products. It is a quick, cute, fun Christmas card. Our card club made it a few weeks ago. Trust me – This set is just going to make you smile. Full instructions are provided below the picture.

Instructions for making this card:
- This card features the amazing Cookie Cutter Christmas stamp set and corresponding builder punch.
2. This base of this card is a Crumb Cake notecard. Early Espresso, cut to 3 ¼ x 4 ¾” is the next layer (not yet adhered to the card base).
3. The primary layer for the card is a piece of Candy Cane Lane DSP cut to 3” x 4”. The DSP piece is then cut to 3” x 3”, taking 1” off the bottom of the piece.
4. One piece of Real Red card stock is cut to 4” x 1 ¼” A piece of Whisper White card stock is cut to 4” x 7/8” At the top of the Whisper White piece, “warm heartfelt greetings for a very merry Christmas” is stamped in Early Espresso. Washi tape from the Candy Cane Lane Designer Washi Tape collection is used to decorate the bottom of the Whisper White piece, as shown. The finished Whisper White piece is adhered to the Real Red Piece.
5. The gingerbread cookie image is stamped onto Whisper White card stock using Crumb Cake ink. It is punched out with the Cookie Cutter Builder Punch. Two hearts are punched out from Real Red card stock, using the Cookie Cutter Builder Punch, and adhered to the gingerbread cookie image, as shown.
6. Two gingerbread cookie shapes in Early Espresso are punched out and adhered to the back of the Crumb Cake gingerbread cookie cutout, as shown.
7. The card is assembled as follows:
a) The DSP is adhered to the Early Espresso piece with the 3” x 3” at the top and the 3” x 1” at the bottom. There will be a gap in the DSP paper. It will be covered by the Real Red piece.
b) Adhere the Real Red piece to cover the gap. Trim the excess Real Red paper to make sure the edges are flush with the Early Espresso piece.
c) Adhere the Early Espresso to the card base.
d) Adhere the gingerbread cookie piece, as shown.
Products used to create this card are shown below. Click on any picture, and you’ll go to my on-line store.
Happy stamping!
Laurie
|
|
||
|
|


