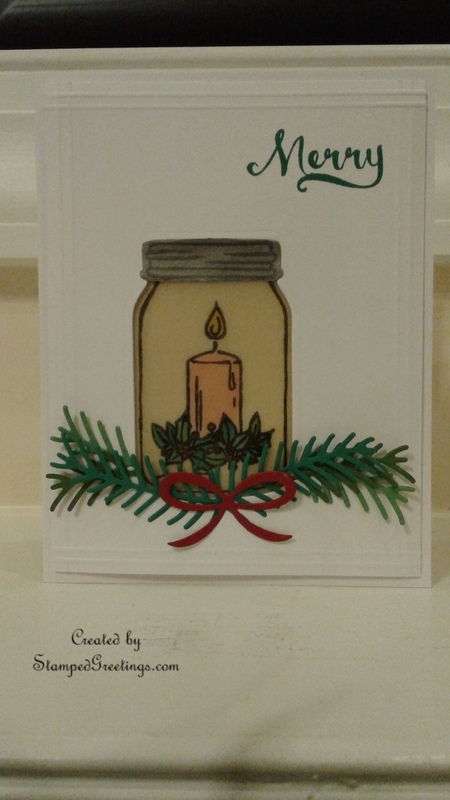
It’s never too early to start planning and making Christmas cards. The card pictured below is one of three projects that our stamp club made last weekend. The clean lines and simple design make this card a stunning Christmas greeting for your friends and family.

Below are the instructions to make the card.
- The card base is a piece of Whisper White card stock cut to 8 1/2″ x 5 1/2″, scored at 4 1/4″ on the 8 1/2″ side.
- The card front is a piece of Whisper White card stock cut to 4″ x 5 1/4″.
- Using the large mason jar framelit from the Everyday Jars Framelits, die cut a jar shape on the card front as shown in the picture.
- Using Memento black ink, stamp the candle image and jar image (from the Jar of Cheer set) on a piece of vellum. Make sure the vellum is cut large enough to cover the opening for the jar plus, at least, half an inch on each side.
- On the unstamped side of the vellum, use markers to color the stamped image. This technique is stained glass coloring. Be sure not to go outside the lines of the image.
- On a silver piece of card stock, stamp the jar lid in Memento black ink. Die cut the lid with the corresponding framelit from the Everyday Jar set.
- Stamp “Merry”, from the Jar of Cheer set, in Emerald Envy ink as pictured.
- Hopefully, you can see that the sides of the card front have scored lines as subtle decoration. The score lines are 1/8″ apart, and the outer score line on each side is 1/8″ from the edge. Use your favorite scoring board and bone folder to add these decorations. Score on the back side of the card front.
- Die cut pine boughs with the smallest pine bough framelit from the Pretty Pines Thinlits dies. Multiple shades of green card stock help add interest to the card. Also, die cut a bow with the smaller bow framelit. Choose your favorite red card stock for the bow.
- Before assembling the card, cut a piece of Crushed Curry card stock that is about the same size as the vellum. This piece will be put behind the colored candle and will give a subtle illusion of light shining in the jar.
- To assemble the card:
- Adhere the Crushed Curry piece to the card base. Make sure the Crushed Curry is adhered so that it will be positioned behind the jar opening on the card front.
- Adhere the vellum to the back of the card front. Tape is the best adhesive for this since it will not cause rippling in the vellum.
- Next adhere the jar lid as shown in the picture.
- Place the pine boughs around the bottom of the jar. Glue the ends of the pine boughs to the card front after you’ve decided on their arrangement. Then, adhere the die cut bow where you would like.
- The finished card front is then adhered to the front of the card with dimensionals.
Below are the products that I used to make the card. If you click on any of the products, you’ll be taken to my on-line store.
Happy Stamping!
Laurie
|
|
||
|
|
|
|
|
|
|
|
|
|


