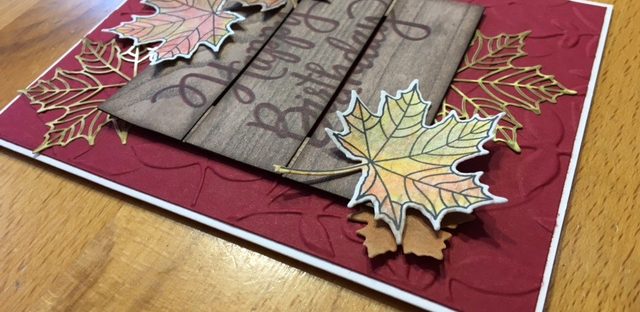
Recently while I have been driving around town, I have caught myself smiling at the beautiful autumn colors. This year, the colors seem more intense and vivid than in past years. Perhaps, I’m just appreciating the beauty more. Either way, the foliage is just gorgeous!
Last week, I shared a card that I made for an NC Demos Blog Hop. You can see that card here. Using a similar layout, I also created a birthday card for our older daughter, Corie. The birthday card captures the beauty of the season and shows the simple elegance of the Wood Textures Designer Series Paper (DSP) Stack. It features the wonderful fall color, Cherry Cobbler.
Below are steps and hints for you to follow to make this card.
- The card base is made from Thick Whisper White card stock, cut to 8 1/2″ x 5 1/2″ and scored at 4 1/4″ on the 8 1/2″ side. I like to use Thick Whisper White card stock as the base for cards when there are multiple layers to add to the card front.
- The card front is a piece of Cherry Cobbler card stock, cut to 4″ x 5 1/4″. To give the card front a beautiful dimension, the piece was embossed with the Layered Leaves Dynamic Textured Impressions Embossing Folder.
- The sentiment is stamped with the Stylized Birthday Stamp onto a piece of the Wood Textures DSP which is cut to 3″ x 3″. I used my Stamp-a-Ma-Jig to stamp Happy Birthday and stamped the sentiment twice. The first time, I used Tuxedo Black Memento Ink. The second time, I shifted the Stamp-a-Ma-Jig just a tad to the left and stamped with Cherry Cobbler ink. The result is a shadow effect on the lettering.
- The DSP is then cut into three strips. Each is 1″ x 3″, as pictured. To add a little depth to the wood “planks”, I sponged the edges of each piece with Early Espresso ink. Two scrap pieces of the DSP are used as the base to glue on the “planks”. You can see those scrap pieces on either side of the “planks” in the picture.
- At this point, I recommend that you start putting your card together. Adhere the card front to your card base. Then, use dimensionals to adhere the sentiment piece to the card front.
- Now, it’s time to make the leaves. Grab a few scrap pieces of your Wood Textures DSP and the Colorful Seasons stamp set. Use Tuxedo Black Memento Ink to stamp the large, veined leaf stamp onto the DSP. Watercolor the leaves with your choice of color from your Watercolor Pencils. Blend the colors with your Aqua Painter, using the absolute least amount possible of water on the Aqua Painter brush. You can add more color to the leaves when they are still wet. You’re going to love this technique! Use the corresponding leaf die from the Seasonal Layers Thinlits Die set to cut out your colored leaves.
- You can also use the smaller leaf die in Seasonal Layers Thinlits Die set to cut leaves from the scrap Wood Textures DSP.
- The final leaves are made from the detailed leaf die and gold paper. [You can also cheat if you have leftover gold leaf stickers from the October Paper Pumpkin kit!]
- Assemble the leaves as you would like and adhere them to your card.
- And, there you have it! A really pretty autumn birthday card that helps capture the beauty of the season.
Below are the main products that I used to make this card. Click on any picture and you’ll go to my on-line store.
Here the two recent posts with a similar design side-by-side. Which one do you prefer?
Happy stamping!
Laurie
|
|
||
|
|
|
|
|
|
|
|


