Remember: One stamp set – Three designs – Endless possibilities
As promised, here is the second design idea using the Rose Wonder stamp set from the Occasions catalog. [If you haven’t seen the first design, be sure to check out this post – Rose Wonder – Wedding Card]

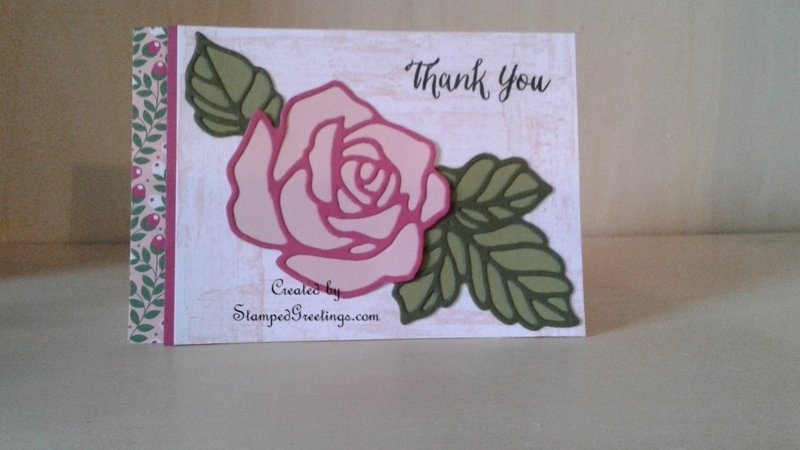
This design is one that can be altered very easily to accommodate many different dies that I bet you already have in your supply stash. This was the second card that was made at our recent stamp club meeting. It was a huge hit and fun to make. Here are the step-by-step instructions:
- A whisper white note card and corresponding envelope (Annual catalog, pg 149) are used as the base.
- The base for the front of the card is a piece of white cardstock cut to 3 ½ x 4 ½.
- The DSP is the Love Blossoms paper stack cut to ¾” x 4. Adhere the DSP to the front left side of the note card. Trim off the excess from the back.
- Use your choice of stamps from the Timeless Textures stamp set (Occasions Catalog, pg 29) to create a background on the card front. Use Brushing Bride ink for the color.
- Die cut the rose from Rose Red card stock. The die is from the Rose Garden Thinlits dies collection.
- Use the largest die in the collection to cut leaves from Mossy Meadow cardstock.
- Glue the rose die cut to a piece of 3” x 3” Blushing Bride cardstock. The two-way glue pen (Annual catalog, pg 156) works well to adhere the die cut. Trim around the edges of the die cut rose to get a stained glass effect, as pictured. Repeat this process for the leaves, by gluing them to a piece of 3” x 4” Old Olive cardstock. Both leaf pieces will fit on the Old Olive piece.
- Stamp “Thank You” from the Rose Wonder stamp set in black ink in the top right corner of the card front.
- Adhere a piece of Rose Red cardstock behind the left side of the card front to add a thin piece of color.
- Adhere the rose and leaf pieces as you would like.
- Use dimensionals to adhere the card front to the note card.
- A corresponding piece of DSP from the Love Blossoms paper stack is a great way to dress up the liner for the envelope.
The Timeless Textures stamp set is now my favorite go-to set to make fun backgrounds. You will easily get addicted to this set – just a friendly warning!
Here are the supplies I used to create the card pictured above. Check your cardstock supplies to see what colors you have for the flowers and leaves. You’re absolutely going to love the Rose Wonder and Timeless Textures stamp sets – trust me on that!
Happy Stamping!
|
|
|
|
|
|
||
|
|


