I am absolutely hooked on the amazing Jar of Love stamp set and corresponding Everyday Jar framelits dies. There are so many ways to use the stamps and dies that you will never run out of creative ideas for this bundle. And, just wait until you see the Holiday catalog because there are additional sets that can be used with the Everyday Jar framelits dies. There is a gorgeous Christmas stamp set and a very fun Halloween themed stamp set. If you haven’t purchased the Jar of Love bundle yet, I strongly recommend that you consider it.
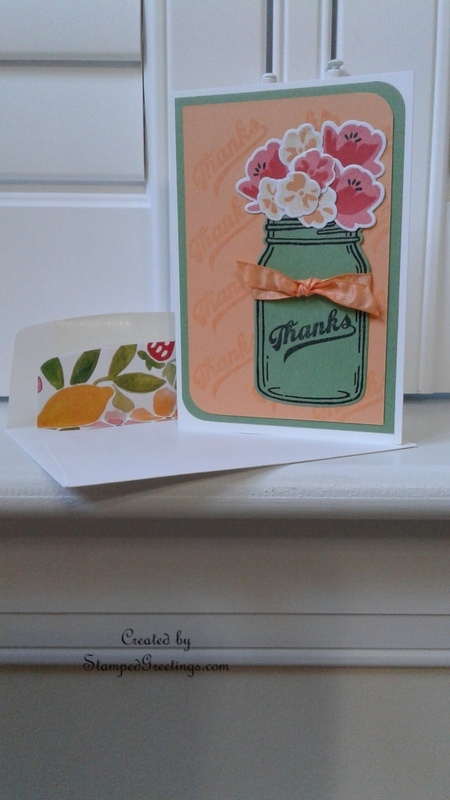
Here is one of the cards that our card club made at a recent meeting. It is the first design that I’m sharing featuring the Jar of Love bundle. There are more designs to come. Full instructions and a few tips are included below the picture.

Here are the instructions for the card:
1 .This card and envelope feature the amazing Jar of Love stamp set, corresponding Everyday Jars framelits dies, and the gorgeous Fruit Stand designer series paper. The card base and envelope are from the Whisper White notecards and envelopes collection.
2. Cut a piece of Mint Macaron cardstock to 3 ¼” x 4 ¾”. Use Memento black ink to stamp the medium jar from the Jar of Love stamp set in the middle of the Mint Macaron piece. [This is a great tip for conserving paper!]. Die cut the jar image from the Mint Macaron piece using the corresponding die from the Everyday Jar framelits dies set. If you would like, corner round two corners of the Mint Macaron piece, as pictured. Adhere the Mint Macaron piece to the card base. [Yes – You’ll see the opening where the jar was die cut, but the opening will be covered by the Peekaboo Peach cardstock!]
3. Cut a piece of Peekaboo Peach cardstock to 3” x 4 ½”. If you would like, corner round two corners of the Peekaboo Peach piece, as pictured. Use Versamark ink to randomly stamp “Thanks” from the Jar of Love stamp set onto the Peekaboo Peach piece. Adhere the Peekaboo Peach piece on top of the Mint Macaron piece, as pictured. [Now you can’t see the opening from where the jar was die cut!]
4. Use Memento black ink to stamp “Thanks” on the die cut jar. Be sure to leave enough room above “Thanks” for your ribbon.
5. Cut a piece of the Peekaboo Peach 3/8” ruched ribbon to about 3” long. Wrap the ribbon around the jar, as pictured, and tape both ends to the back of the die cut jar. Cut another piece of the ruched ribbon to about 3”. Tuck one end of the second piece under the taped piece of ribbon. Tie a knot in the second piece of ribbon. You’ve created a fake bow! You can move the second piece from left to right along the taped ribbon to place it where you want it. Cut the ends of the second ribbon as you would like.
6. To make the flowers, use the flower stamps from the Jar of Love stamp set. Remember – the base flower stamp (the solid stamp) should be a lighter color than the corresponding, detailed stamp. The pictured pink flowers were inked with Flirty Flamingo (background) and Watermelon Wonder (detail). The pictured peach flowers were inked only with Peekaboo Peach. The background color was created by stamping off the Peekaboo Peach once. The detailed color was created by simply using Peekaboo Peach. The flowers were die cut with the corresponding dies from the Everyday Jars framelits dies set.
7. The final touch is the envelope liner. It is made with the absolutely gorgeous Fruit Stand designer series paper. Pick the design that you feel matches the card the best. Your choice may depend on the colors that you use to make the flowers.
Below are the products that I used to make the card. If you click on a picture of any product, you’ll go to my on-line store.
Happy stamping!
Laurie
|
|
|
|
|
|
|
|


